A lot has changed since then so I thought it was about time I updated. Especially since this weekend I switched from Jenkins to GitHub Actions.
So, a quick disclaimer before I go on: GitHub Actions is currently in public beta. They have been clear that it is not yet considered stable for production and comes with no warranty. It could change and break my setup at any time. They also haven’t released any information about what it will cost when it is fully out. These are my personal apps so I’m fine with all of that. I’ll try to remember to update this post when the beta is over, but in the meantime, use it at your own risk.
My old post covered the basic setup and, honestly, the general approach hasn’t changed much; I’ve just been swapping out the pieces. It’s worth reading the old post for more details, but I’ll recap the basic approach here so the rest of this post can just cover the new GitHub Actions stuff.
I’m still packaging Django apps up in Docker images. My Dockerfile has changed, but these days there are a million articles on how to run Django in Docker, so I won’t cover those changes.
I have three application servers where the Django apps run. Each app gets deployed to at least two of them so there is redundancy. This means that a server can fail or go down for maintenance without the site going down. For some of them, there are also Celery Worker and Celery Beat services running to handle offline tasks. There’s an nginx proxy in front of that setup proxying back to the individual Django apps. Consul, consul-template, and registrator are used to dynamically adjust the proxying setup so everything is handled smoothly when a server goes down or when an application instance is added or removed. This part still works basically the same so see the old post if you want more details on how that works.
My servers are all managed with Salt, including the production settings and secrets. The Docker containers get those settings in environment variables. Those variables are put in place by Salt and handed to the containers via a couple shell scripts. Again, that part is all unchanged and you can get more details in the old post. What’s relevant here is that there is a docker-runner script on each server that will run an application’s container with all of the production settings injected and let me basically do manage.py commands in those containers. So docker-runner myapp migrate is equivalent to starting up the thraxil/myapp:$TAG container (where $TAG is specified in a designated file and is generally a git hash) with production settings and running manage.py migrate in the container.
Static files are hosted on Amazon S3 and CloudFront. Again, this is pretty typical for Django deployments and is better covered elsewhere. All you need to know for my setup is that manage.py collectstatic and manage.py compress need to be called during the deployment to push the latest static files up.
The old approach to deployment was that I ran Jenkins server alongside my app servers. When there was a push to the master branch on GitHub, it would trigger a build there, which would do the following:
Build a new docker image for the app. I like to include running unit tests as part of the Dockerfile. That ensures that the tests pass in the exact environment with all the same dependencies as the code will have in production.
Tag that image and push it to the Docker Hub.
Do a docker pull of that exact tag on all of the app servers.
Write the tag out to the right place on those servers so docker-runner will use that version of the image.
On one of the servers, run docker-runner myapp migrate, docker-runner myapp collectstatic, and docker-runner myapp compress to handle database migrations and static files.
One by one, restart the processes on the app servers.
Jenkins used to run those steps with a fairly small shell script described in the old post. At some point, I converted that to a “proper” Jenkins pipeline specified in a Jenkinsfile. I never wrote about that, and I’m replacing it now, but it’s up here if you are curious. It did some things better than the the shell script version and made for a much nicer overall experience in the Jenkins web interface, but mostly it made me glad that I don’t often have to code in Groovy.
Jenkins worked OK for me but it’s always been a pretty awkward part of the stack and not a lot of fun to run and keep updated.
So when Github Actions came out and I got access to the public beta, I decided to see if I could replace my Jenkins setup.
What I came up with is seems to work pretty well.
Actions for a project are stored as code in a .github directory in your project. There’s a nice web UI for editing actions, but it’s worth looking at the code. My old blog post covered the deployment of my antisocial feed reader app, so for consistency, let’s look at how the GitHub Actions setup looks for it.
I have two workflows. The first just sets up and runs Jessie Frazelle’s branch-cleanup-action
GitHub action which keeps things tidy by deleting merged branches. She has a great blog post on how it works that helped me start to get my head around Actions.
The main deploy workflow, in .github/workflows/deploy.yml starts with:
That builds the docker image, tagged with the git SHA, which GitHub Actions conveniently exposes in the github.sha variable. As I mentioned before, with my Dockerfiles, the unit tests run during the build, so this step also serves as a good check on PRs.
They log us into the Docker Hub and push the docker image there. The only new bit is that the login step uses the secrets field to grant itself access to some secret settings that are stored in the GitHub project settings.
The bulk of the deploy work (that I had to do, at least) is in the next stanza:
That uses a custom action that I placed in its own repo so I could easily re-use it across my projects.
The great thing about GitHub Actions is that they are just Docker containers that get some specific environment variables and shared directories set up and run how you need them. GitHub Actions will find the Dockerfile in there, build it (if it hasn’t already cached), and run it in the appropriate environment.
That means that it’s easy to package up pretty much any common deployment tool you can think of as a GitHub Action (if someone else hasn’t already done it) or just put your own together if you know how to make a Docker image and write a little shell script.
If I were doing this from scratch or if it were a more complicated deployment process, I’d probably grab or build an Ansible action and do the rest of the deployment that way. In my case though, it’s only a couple steps and I pretty much already had a shell script written (see the old post). So I just made an action that pretty much runs that script in a container, with some tweaks to make it work in the new environment.
The Dockerfile is pretty minimal. Just builds off debian:stable-slim (which GitHub highly recommends to keep images small and using a common base to maximize caching), installs openssh-client (the only package we need that isn’t already there) and drops in a small script.
That script should look familiar from the old blog post. It just does a few additional things to deal with the GitHub environment variables and setting up a valid SSH config. All of the variables that it needs are either set via env in the workflow config above, or they are stored in the project settings as secrets (SSH private key, etc.)
Finally, since I like to use Sentry to track exceptions and Sentry does a better job if you tell it when you deploy new code, I use a community published action to publish a new sentry release for the project:
That’s basically it. I’m mostly pleased with the setup. It took me a few hours to figure out all the pieces and work through some stupid bugs (my own) to get it working how I wanted, but now it’s pretty solid.
Like I said earlier, I really like that it works by just stringing together Docker containers. That means there’s never any question about when GitHub Actions will support some tool. If you can stick it in a Docker image, you can use it. Configuration is straightforward once you’ve spent some time with it (and the Web UI is surprisingly usable and powerful).
I feel like I’m only scratching the surface of what it’s capable of (I’m not even running anything in parallel). The more interesting uses will be less of this “traditional” kind of deployment pipeline and will take better advantage of the Actions’ direct access to the rest of GitHub’s APIs. Right now it feels like the community is still figuring out what those possibilities are and I’m excited to see what patterns emerge.
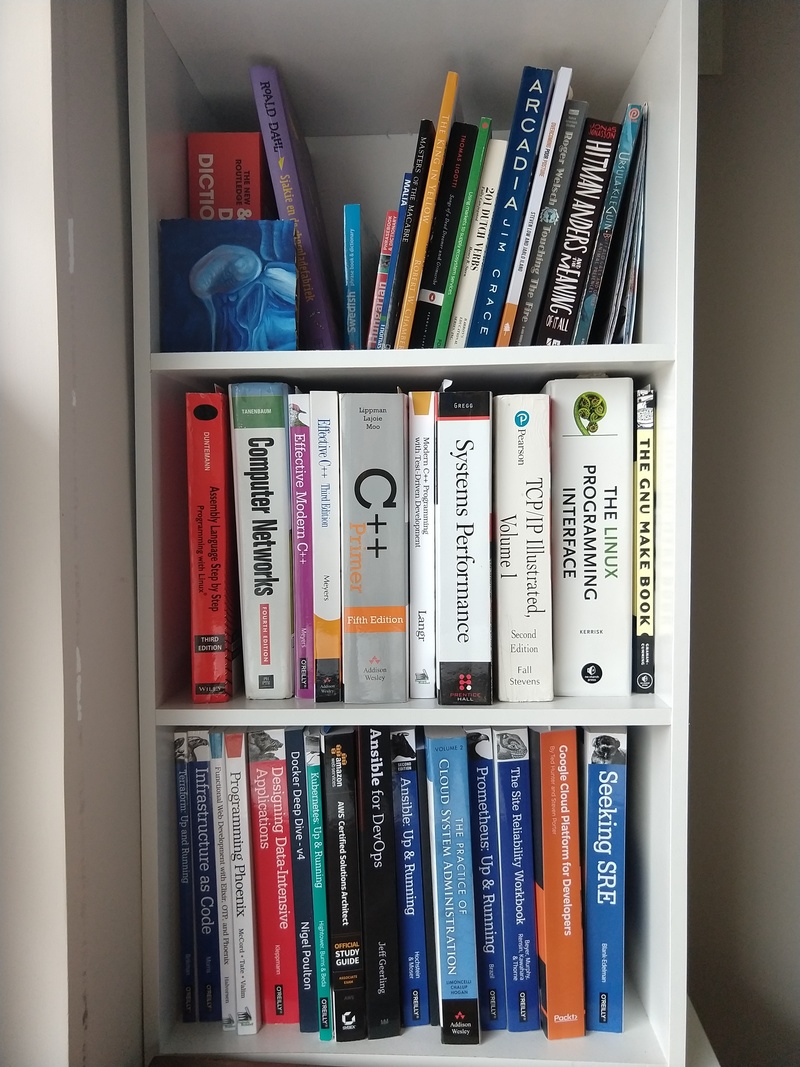
The #shelfie hashtag has been coming up lately. I’m bad at social media, but I thought I’d post mine here.
I moved from the US to Europe a few years ago and I had to massively cut down my book collection. In the last few years, I’ve started accumulating books again, but I’ve been a bit more purposeful this time around. So most of the books on my shelves are ones that I decided were important enough to bring across the ocean with me or that I’ve wanted to have for reference since the move. Fiction and “lighter” non-fiction that I’m only going to read through once I try to buy in electronic formats so it doesn’t take up precious space in my flat.
My books are vaguely organized though not totally consistently. The top shelf here is the really random stuff, including the few bits of fiction I have in physical form, Dutch language books (that’s “Charlie and the Chocolate Factory” in Dutch), and of course, one of my small paintings in the front.
The middle shelf is sort of C++, Linux, Networking, and low level systems stuff.
Bottom is mostly Cloud, DevOps, and SRE related.
These shelves are right below a window so I had a hard time getting a clearer photo without it washing out a bit.
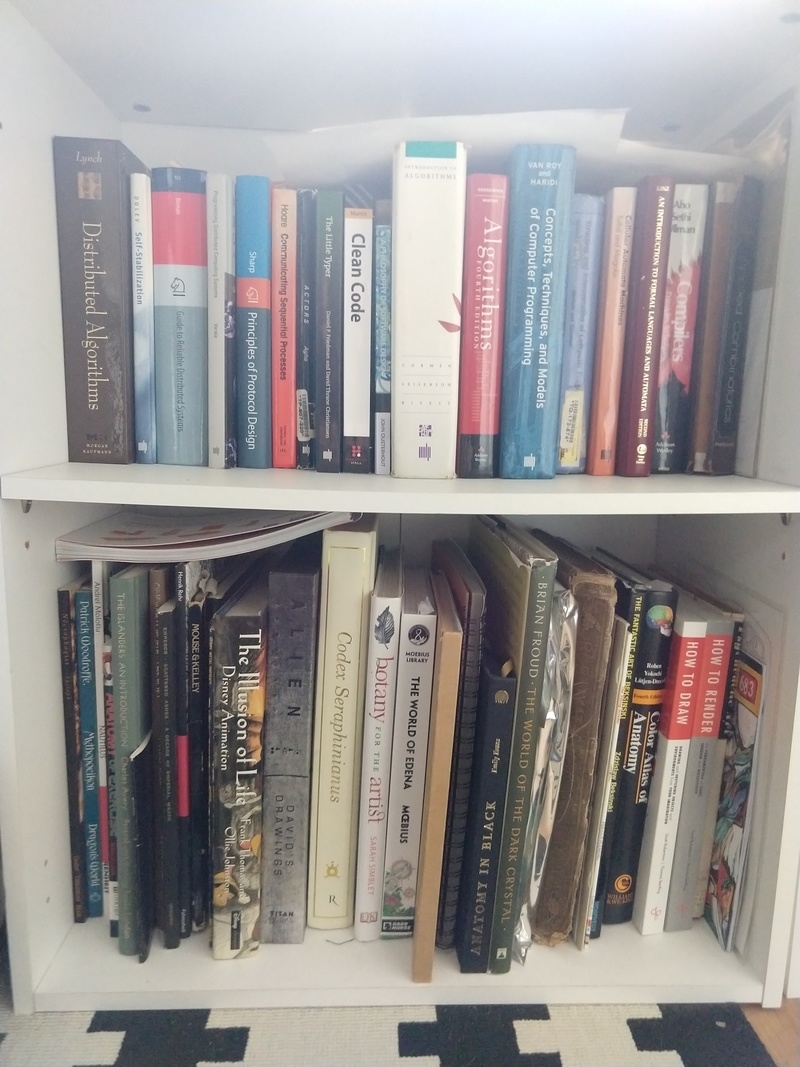
Top shelf here is focused more on CS and distributed systems. Some classics here like SICP, CLSR, the Dragon Book, CTM, etc.
Bottom shelf is the fun one with my weird art books. The foil wrapped one is the NASA Graphics Standards Manual. The old looking one next to it is an 1800’s edition of Elihu Vedder’s illustrated version of the Rubaiyat of Omar Khayyam.
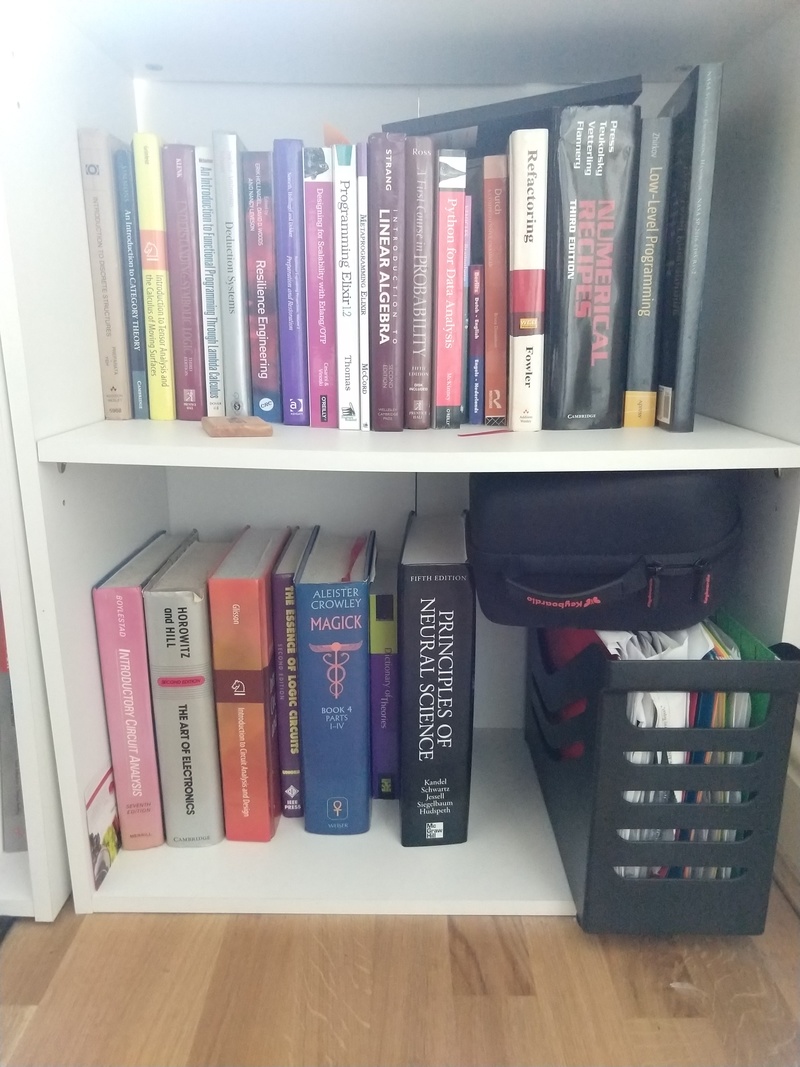
Top here is math and random programming books that didn’t fit on the other shelves.
The bottom shelf has a few electronics books and random large ones that won’t fit elsewhere. The filing box is mostly full of printed out CS papers.
It took me a little longer than I’d planned, but here is my yearly music round up for 2018 just as I’ve done for 2017, 2016, and 2015.
As usual, this isn’t exhaustive and only includes bandcamp links. I have no other commentary other than that I enjoyed these. My tastes run towards weird, dark, loud, and atmospheric. Enjoy.
I posted my yearly music roundup yesterday, which I’ve done for
the last threeyears. Today I thought I’d just take a moment
to explain how I go about creating those posts. Eg, there are 165
albums in the last post and I link both the artist and album pages on
each. Do you really think I manually typed out the code for 330 links?
Hell no! I’m a programmer, I automate stuff like that.
First of all, I find music via a ton of different sources. I follow
people on Twitter, I subscribe to various blogs’ RSS feeds, and I hang
out in a bunch of music related forums online. So I’m constantly
having new music show up. I usually end up opening them in a new tab
until I get a chance to actually listen to them. Once I’ve listened to
an album and decided to save it to my list, my automation process
begins.
I’m a longtime emacs user, so I have a capture template set up for
emacs org-mode. When I want to save a music link, I copy the URL in
the browser, then hit one keyboard shortcut in emacs (I always have
an emacs instance running), I paste the link there and type the name
of the artist. That appends it to a list in a text file. The whole
process takes a few seconds. Not a big deal.
At the end of the year, I have this text file full of links. The first
few lines of this last year’s looks something like this:
For the first two years, I took a fairly crude approach and just record
an ad-hoc emacs macro that would transform, eg, the first line into
some markdown like:
A little text manipulation like that’s a really basic thing to do in
emacs. Once the macro is recorded, I can just hit one key over and
over to repeat it for every line.
Having done this for three years now though, I’ve noticed a few
problems, and wanted to do a little more as well.
First, You’ll notice that the newest post links both the artist and
the album. This, despite the fact that I only captured the album link
originally.
Second, if you look closely, you’ll notice that not all of the bandcamp links are quite the
same format. Most of them are
<artist>.bandcamp.com/album/<album-name>, but there are a few anomalies like
https://hawkbill.bandcamp.com/track/fever or
https://withoutdoom.bandcamp.com/ or
https://wiegedood.bandcamp.com/releases. The first of those was a
link to a specific track on an album, the latter two both link to the
“artist page”, but if an artist on bandcamp only has one album, that
page displays the data for that album. Unfortunately, that’s a bad
link to use. If the artist adds another album later, it changes. Some
of the links on my old posts were like those and now just point at the
generic artist page.
So, going from just the original link that I’d saved off, whatever
type it happened to be, I wanted to be able to get the artist name,
album name, and a proper, longterm link for each.
I’ve written some emacs lisp over the years and I have no doubt that
if I really wanted to, I could do it all in emacs. But writing a
web-scraper in emacs is a little masochistic, even for me.
The patth of least resisttance for me probably would’ve been to do it
in Python. Python has a lot of handy libraries for that kind of thing
and it would’ve have taken very long.
I’ve been on a Go kick lately though, and I ran across
colly, which looked like a pretty
solid scraping framework for Go, so I decided to implement it with
that.
First, using colly, I wrote a very basic
scraper for bandcamp
to give me a nice layer of abstraction. Then I threw together a real
simple program using it to go through my list of links, scrape the
data for each, and generate the markdown syntax:
For the third year in a row, here is my roundup of music released in 2017 that I enjoyed.
One of the reasons that I’ve been making these lists is to counteract a sentiment that I encounter a lot, especially with people my age or older. I often hear people say something to the effect of “The music nowadays just isn’t as good as [insert time period when they were in their teens and twenties]”. Sometimes this also comes with arguments about how the internet/filesharing/etc. have killed creativity because artists can’t make money anymore so all that’s left is the corporate friendly mainstream stuff. I’m not going to get into the argument about filesharing and whether musicians are better or worse off than in the past (hot take: musicians have always been screwed over by the music industry, the details of exactly how are the only thing that technology is changing). But I think the general feeling that music now isn’t like the “good old days” is bullshit and the result of mental laziness and stagnation. We naturally fall into habits of just listening to the music that we know we like instead of going out looking for new stuff and exploring with an open mind. My tastes run towards weird dark heavy metal, so that’s what you’ll see here, but I guarantee that for whatever other genres you are into, if you put the effort into looking just a little off the beaten path, you could find just as much great new music coming out every year. I certainly love many of the albums and bands of my youth, but I also feel like the sixteen year old me would be really into any one of these as well.
OK, I know I’ve said that I don’t do “top 10” lists or anything like that, but if you’ve made it all the way to the bottom of this post, I do want to highlight a few that were particularly notable: Bell Witch, Boris, Chelsea Wolfe, Goatwhore, Godflesh, King Woman, Lingua Ignota, Myrkyr, Pallbearer, Portal, The Bug vs Earth, Woe, and Wolves in the Throne Room.
Plus special mention to Tyrannosorceress for having my favorite band name of the year.
Last night, I was scanning the /r/guitarpedals subreddit. Something I have been known to do… occasionally.
I see this post:
OK, someone’s trying to identify a pedal they came across in a studio. I’m not really an expert on boutique pedals, but I have spent a little time on guitar forums over the years so who knows, maybe I can help?
Clicking the link, there’s a better shot of the pedal:
Hmm… nope, don’t recognize it. Close the tab…
OK, yeah, the pedal doesn’t look familiar, but the artwork on it sure does…
So at some point, someone out there built a custom guitar pedal, used one of my drawings for it, it ended up in a recording studio somewhere, someone else found the pedal in the studio, took a picture, posted it on reddit, and I stumbled on it.
Anyone who’s known me for very long knows that I post all of my artwork online under a Creative Commons Public Domain license. I’m not a career artist and it’s not worth the hassle for me to try to restrict access on my stuff and I’d rather just let anyone use it for whatever they want. So this obviously makes me very happy.
I’ve had plenty of people contacting me over the years asking to use them. That’s unnecessary but appreciated. My paintings and drawings have appeared on dozens of websites and articles. There are a couple books out there that include them (besides the Abstract Comics Anthology that I was actively involved in). I know that there’s at least one obscure death metal album out there that uses one of my paintings for the cover. I’ve had a few people say they were going to get tattoos, but I’ve never seen a photo of the results, so I can’t say for certain whether anyone followed through on that.
This is the first time that I’ve run into my own work like this randomly in a place that I wasn’t looking.
BTW, no one has yet identified the pedal, so obviously, if you know anything about who built it, let me know.
Recently, Github added the ability to archive repositories. That prompted me to dig up some code that I wrote long ago. Stuff that really shouldn’t be used anymore but that I’m still proud of. In general, this got me reminiscing about old projects and I thought I’d take a moment to talk about a couple of them here, which are now archived on Github. Both are web frameworks that I wrote in Python and represent some key points in my personal programming history.
I started writing Python in about 2003, after spending the previous
five years or so working mostly in Perl. Perl was an important
language for me and served me well, but around that point in time, it
felt like every interesting new project I saw was written in Python. I
started using Python on some non web-based applications and
immediately liked it.
Back then, many smaller dynamic sites on the web were still using
CGI. Big sites used Java but it was heavy-weight and slow to develop
in. MS shops used ASP. PHP was starting to gain some popularity and
there were a ton of other options like Cold Fusion that had their own
niches. Perl CGI scripts running on shared Linux hosts were still
super popular. With Perl, if you needed a little more performance than
CGI scripts offered, if you ran your own Apache instance, you could
install mod_perl and see a pretty nice boost (along with some other
benefits). Once you outgrew simple guestbooks and form submission CGI
scripts, you needed a bit more structure to your app. Perl had a
number of templating libraries, rudimentary ORMs, and routing
libraries. Everyone generally picked their favorites and put together
a basic framework. Personally, I used
CGI::Application,
Class::DBI,
and
HTML::Template. It
was nowhere near as nice as frameworks that would come later like Ruby
on Rails or Django, but at the time, it felt pretty slick. I could
develop quickly and keep the code pretty well structured with cleanly
separated models, views, and templates.
Python wasn’t really big in the web world yet. There was Zope, which
had actually been around for quite a while and had proven itself to be
quite capable. Zope was… different though. Like, alien technology
different. It included an object database and basically took a
completely different approach to solving pretty much every
problem. Later, I would spend quite a bit of time with Zope and Plone,
and I have a great deal of respect for it, but as a newcomer to
Python, it was about ten steps too far.
So, in the meantime, I did the really predictable programmer thing and
just ported the stuff I missed from Perl to Python so I could write
applications the same way, but in a language that I had grown to
prefer.
Someone else had already made a port of HTML::Template,
htmltmpl. It worked, but I did
have to make some fixes to get it working the way I liked.
Similarly, Ian Bicking had written
SQLObject, which was a very capable ORM
for the time.
My major undertaking was
cgi_app, which was a port of
CGI::Application, routing HTTP requests to methods on a Python object,
handling the details of rendering templates, and providing a
reasonable interface to HTTP parameters and headers.
It looks pretty basic compared to anything modern, and there are some
clear PEP8 violations, but I remember it actually being pretty
straightforward and productive to work with. I could write something
like
#!/usr/bin/python

from cgi_app import CGI_Application

class Example_App(CGI_Application):
    def setup(self):
        self.start_mode = 'welcome'

    def welcome(self):
        return self.template("welcome.tmpl",{})

    def param_example_form(self):
        return self.template("param_example_form.tmpl",{})

    def param_example(self):
        name = self.param('name')
        return self.template("param_example.tmpl",{'name' : name})

if __name__ == "__main__":
    e = Example_App()
    e.run()
drop that file in a cgi-app directory along with some templates and
have a working app. It was good enough that I could use it for work
and I built more than a few sites with it (including at least one
version of this site).
I quickly added support for other template libraries and
mod_python, the Python equivalent to
mod_perl.
I don’t remember ever really publicising it beyond an
announcement here
and I didn’t think anyone else was really using it. Shockingly
recently though, I got an email offering me some consulting work for a
company that had built their product on it, were still using it, and
wanted to make some changes. That was a weird combination of pride and
horror…
By around 2006 or 2007, the landscape had changed dramatically.
Ruby on Rails 1.0 was released in 2005
and turned everything on its head. Other Python developers like me had
their own little frameworks and were writing code but there wasn’t
really any consensus. Django,
TurboGears, web.py, and
others all appeared and had their fans, but none were immediately
superior to the others and developer resources and mindshare were
split between them. In the meantime, RoR was getting all the press and
developer attention. It was a period of frustration for the Python
community.
Out of that confusion and frustration came something pretty neat
though. A few years earlier, PJE had come up with
WSGI,
the Web Server Gateway Interface, but it hadn’t really taken off. WSGI
was a very simple standard for allowing different web servers and
applications to all communicate through a common interface. At some
point the Python community figured out that standardizing on WSGI
would allow for better integration, more portability, simpler
deployment, and allowed for chaining “middleware” components together
in clever ways. Most of the competing frameworks quickly added WSGI
support. Django took a little longer but eventually came around. The
idea was so good that it eventually was adopted by other languages
(eg, Rack for Ruby).
JSON had mostly pushed out XML for data serialization and web
developers were beginning to appreciate
RESTful architecture. I
began thinking about my own applications in terms of small, extremely
focused REST components that could be stitched together into a full
application. I called this approach “microapps” and was fairly
evangelical about it,
even buying ‘microapps.org’ and setting it up as a site full of
resources (I eventually let that domain lapse and it was bought by
spammers so don’t try going there now). Other smart folks like Ian
Bicking were
thinking in similar ways
it seemed like we were really onto something. Maybe we were. I don’t
really want to take any credit for the whole “microservices” thing
that’s popular now, but I do feel like I see echoes of the same
conversations happening again (and we were just rehashing
SOA and
its predecessors; everything comes back around).
Eventually, after writing quite a few of these (mostly in TurboGears),
almost always backed by a fairly simple model in a relational
database, I began to tire of implementing the same sort of glue logic,
mapping HTTP verbs to basic CRUD operations in the database. So I
wrote a little framework. This was
Bourbon (WSGI can be pronounced
“whiskey”).
Bourbon let me essentially define a single database table (using
SQLALchemy, which was the new cool Python ORM) and expose a REST+JSON
endpoint for it (GET to SELECT, POST or PUT to INSERT, PUT
to UPDATE, and DELETE to DELETE) with absolutely minimal
boilerplate. There were hooks where you could add additional
functionality, but you got all of that pretty much out of the box by
defining your schema and URL patterns.
For a number of reasons, I mostly switched to Django shortly after
that, so I never went too far with it, but it was simple and clear and
super useful for prototyping.
In recent years, I’ve built a few apps using
Django Rest Framework and it
has a similar feel (just way more complete).
I don’t have a real point here. I just felt like reminiscing about
some old code. I’ve managed to resist writing a web framework for the
last decade, so at least I’m improving.
A little behind the curve on this one (hey, I’ve been busy), but as of today, every Python app that I run is now on Python3. I’m sure there’s still Python2 code running here and there which I will replace when I notice it, but basically everything is upgraded now.
One of my favorite bits of the Go standard library is expvar. If you’re writing services in Go you are probably already familiar with it. If not, you should fix that.
Expvar just makes it dead simple to expose variables in your program via an easily scraped HTTP and JSON endpoint. By default, it exposes some basic info about the runtime memory usage (allocations, frees, GC stats, etc) but also allows you to easily expose anything else you like in a standardized way.
I still use Graphite for a lot of my metrics collection and monitoring though and noticed a lack of simple tools for geting expvar metrics into Graphite. Peter Bourgon has a Get to Graphite library which is pretty nice but it requires that you add the code to your
applications, which isn’t always ideal.
I just wanted a simple service that would poll a number of expvar endpoints and submit the results to Graphite.
That just tells samlare where your carbon server (the part of Graphite that accepts metrics) lives, how often to poll your endpoints (in ms), and how long to wait on them before timing out (in ms, again). Then you specify as many endpoints as you want. Each is just the URL to hit and what prefix to give the scraped metrics in Graphite. If you specify a FailureMetric, samlare will submit a 1 for that metric if polling that endpoint fails or times out.
There are more options as well for renaming metrics, ignoring metrics, etc, that are described in the README, but that’s the gist of it.
Anyone else who is using Graphite and expvar has probably cobbled something similar together for their purposes, but this has been working quite well for me, so I thought I’d share.
As a bonus, I also have a package, django-expvar that makes
it easy to expose an expvar compatible endpoint in a Django app (which samlare will happily poll).
Once
again,
I can’t be bothered to list my top albums of the year, but here’s a
massive list of all the music that I liked this year (that I could
find on Bandcamp). No attempt at ranking, no commentary, just a
firehose of weird, dark music that I think is worth checking out.